
August 23, 2021
What is Digital Forensics? Defining Digital Forensics and Incident Response


Navigation Links:
How to Create an IP Search Activeboard
How to Create a User Search Activeboard
Having the ability to easily visualize and analyze security data is key to being able to quickly spot and thwart bad actors. Devo provides an easy way to do this with Devo Activeboards, an intuitive, interactive way to visualize data being ingested into the Devo Platform.
Activeboards can be used to assist analysts in incident response (IR) or threat hunting activities. How? Follow this guide to learn how your team can create Activeboards to search multiple Devo tables for indicators of compromise (IOCs), investigate suspicious activity, and ultimately streamline future investigations by lowering analysts’ time to react.
If you’re new to the Devo Platform or are yet to to really dig into Activeboards, you may have seen our Global Search function and think: “Eureka! This will solve all my problems.” While Global Search provides an easy way to search all or a subset of Devo tables at once, it’s not the recommended be-all and end-all, particularly not when it comes to incident response.
As an example, the Global Search tab in the Data Search application will show you table information, the IP and hostname of the device that generated the event, and the original message. Of course, that’s useful, but you’ll likely need more detail and need to filter the data more granuarly to perform more advanced operations.
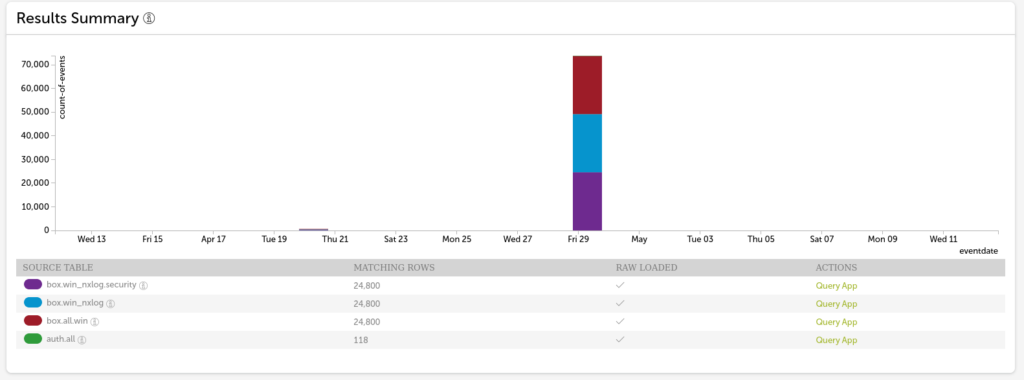
In another example, the Global Search results clearly define table location and count of events.
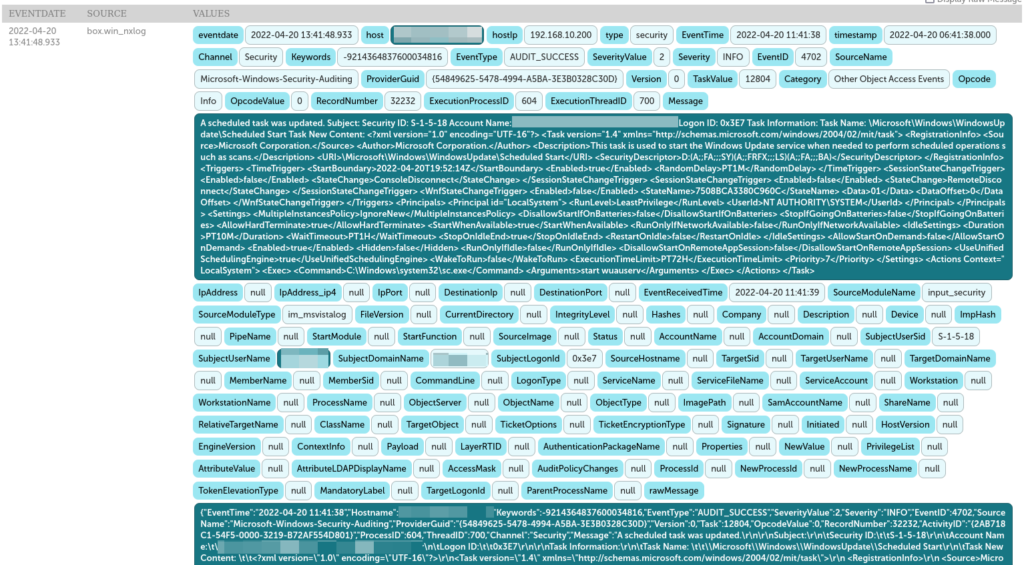
In contrast with the first Global Search example, this application has no shortage of information, providing all fields in a paginated, non-tabular view. While this is easier to digest than the previous search’s presentation, there are some instances where there may be too much information to sift through, and again, Global Search isn’t the best place to filter or modify your data.
Instead of using Global Search for all your incident response work, it can be used as an excellent place to start building an Activeboard, which better enables you to visualize data from any source with a wide range of customizations. Let’s dive into two step-by-step how-to’s.
The first how-to we’ll walk you through is setting up an IP Search Activeboard. To start, you need to identify which Devo tables contain the data you’re interested in. You can search for a common IP address, such as a file or DNS server, in one of the Global Search options at your disposal. This should give you a good starting point, as there should be numerous connections to and from these types of servers from a variety of clients.
Note: We also provide the option to use union tables such as firewall.all.traffic. However, due to application categorization, you may not get a complete picture. Additionally, certain fields may not be present on all tables that feed into the union table, leading to null values populating some fields.
Once you have identified the tables you want to pull data from, you need to make note of which fields contain pertinent data for your investigation. In this example, we will use eventdate, source and destination IP and port, and source and destination zone (where applicable).
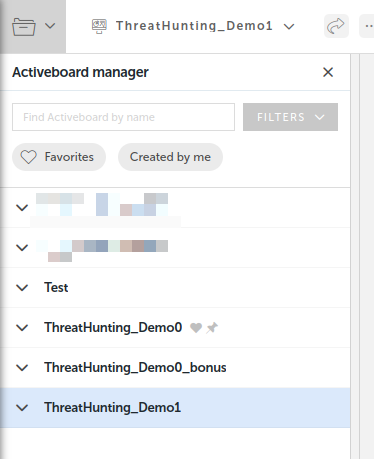
Now that you’ve noted which fields you’re interested in, you can start building the Activeboard. First, navigate to the Activeboards section of the Devo interface, select the Activeboard manager, and then click “New Activeboard” at the bottom of the sidebar.

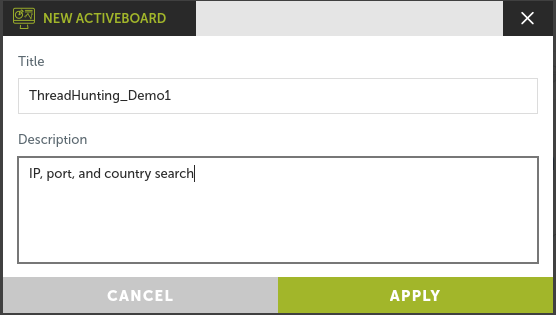
Provide a name and description for the Activeboard, then click apply.
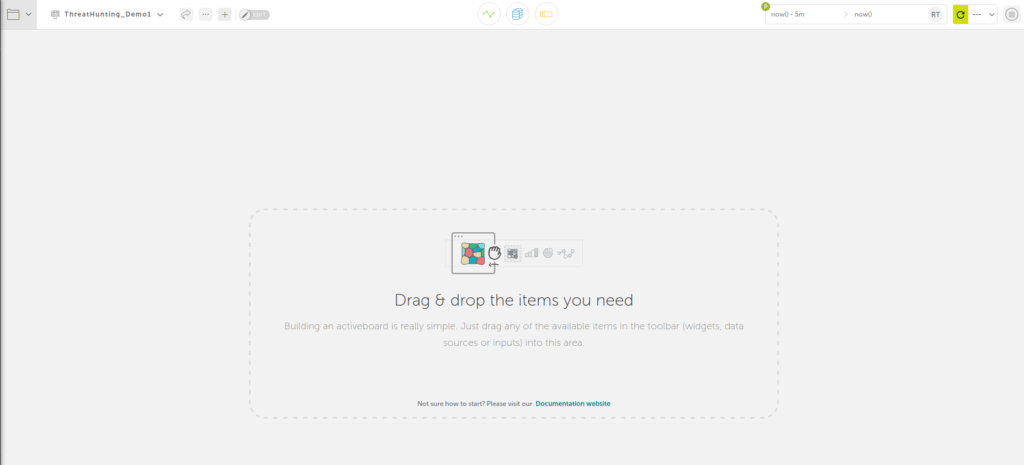
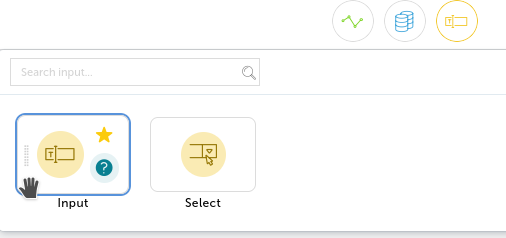
Now that you have a blank Activeboard canvas, add your search boxes. You want to be able to search by IP address, port number, and country (an enrichment you will add later in this guide). After clicking on the “Inputs” object type menu at the top of the screen, you can drag three Input boxes onto your Activeboard.
Note: Widget placement can be altered after being added to the Activeboard.
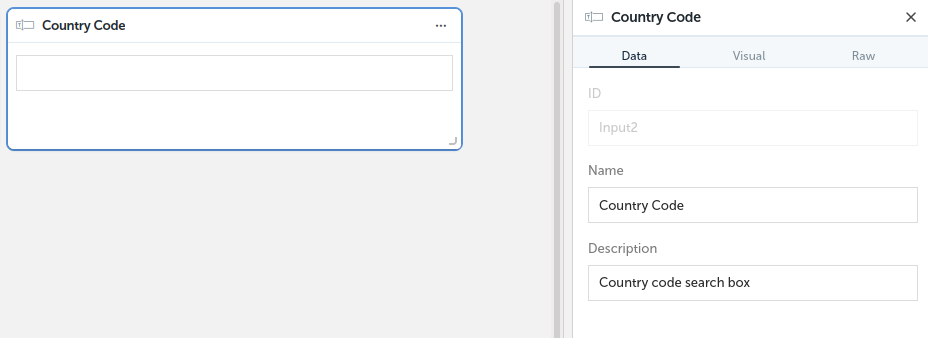
Once you have three Input boxes, you can click each one and alter the name and description on the right sidebar (Input0 > IP, Input1 > Port, and Input2 > Country Code); the ID is fixed and cannot be changed. With the Input/ search boxes in place, you can now add data tables.
Note: You can rearrange and resize any widget on an Activeboard; you should be mindful of widget placement to create a layout that is easy to digest.
Note: While you are building an Activeboard, it’s recommended to narrow the time frame on your Activeboard to prevent having to wait for large datasets to load every time you make a minor change. In a later step, you will set result limits on the tables to prevent this and gain better performance for longer time frames.
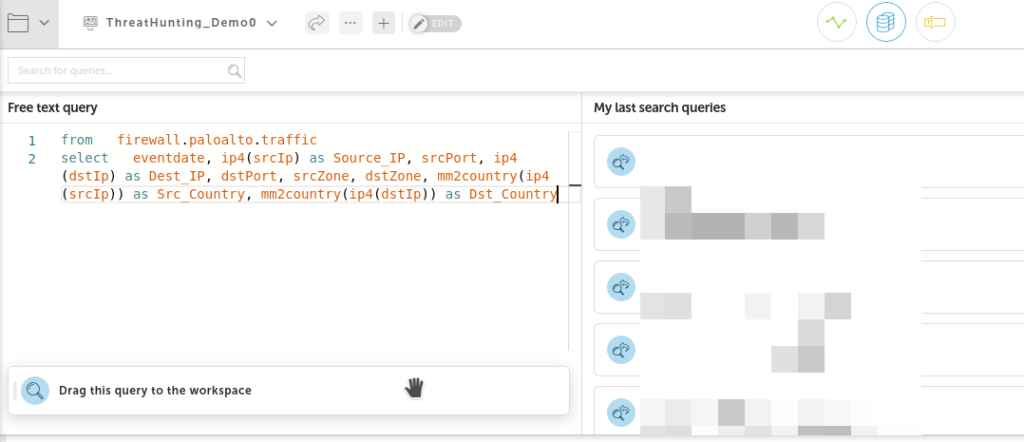
Using the first table and associated fields we identified earlier, create a data widget by clicking the “Data” icon at the top of our screen, entering the below LINQ query, and dragging it onto your workspace. Note that you add columns for country codes for both source and destination IPs using the MaxMind2 “mm2country” operation and force the IP fields to the ip4 object type in case they are normally strings. Changing the order the fields are listed in the query will have a direct effect on the order they are presented in the table, so feel free to rearrange them as needed.
| from firewall.paloalto.traffic select eventdate, ip4(srcIp) as Source_IP, srcPort, ip4(dstIp) as Dest_IP, dstPort, srcZone, dstZone, mm2country(ip4(srcIp)) as Src_Country, mm2country(ip4(dstIp)) as Dst_Country |
With your first table in place and displaying the fields you’re interested in, you can now modify the query to make use of Devo’s search/ input boxes. For all three searches, Devo has three conditions to account for:
To account for these scenarios, you add the following line to the LINQ query for the table:
| where isempty($Input0.value) or toktains(Source_IP, $Input0.value) or toktains(Dest_IP, $Input0.value) |
The first operation returns events when the value of Input0 (our IP search box) is empty, the second returns matches for the search criteria on the source IP, and the third “or” matches on the destination. Next, create a similar line in the query, replacing values for the port search box (Input1) and exchanging IP fields for corresponding port fields:
| where isempty($Input1.value) or toktains(srcPort, $Input1.value) or toktains(dstPort, $Input1.value) |
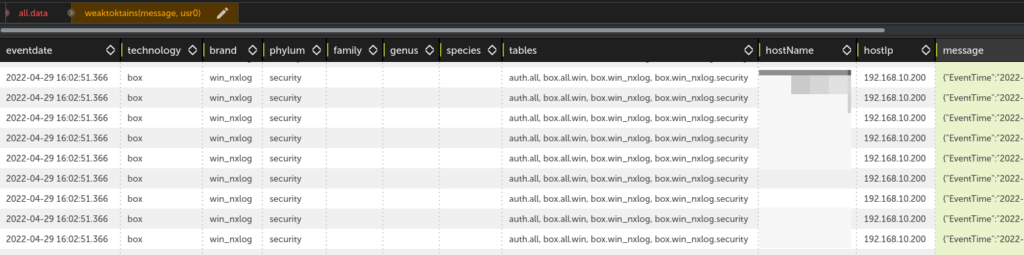
Finally, add a line for the country code search box (Input2). This time, though, use the case-insensitive “weaktoktains” operation so analysts don’t need to remember to search in all-caps:
| where isempty($Input2.value) or weaktoktains(Src_Country, $Input2.value) or weaktoktains(Dst_Country, $Input2.value) |
Optional: Some of the source tables we work with have the potential to contain significant amounts of events, into the millions per hour. To avoid this negatively impacting the performance of our Activeboard, you can add a limit to the data widgets so they only show a set amount of the results. This will enable you to work with wider timelines while still loading more results than would be reasonable for a human to read. To add a limit to data widgets, add the following to the end of the LINQ query, altering the number to best suit our needs:
| limit 10000 |
In the end, you have your completed query:
| from firewall.paloalto.traffic select eventdate, ip4(srcIp) as Source_IP, srcPort, ip4(dstIp) as Dest_IP, dstPort, srcZone, dstZone, mm2country(ip4(srcIp)) as Src_Country, mm2country(ip4(dstIp)) as Dst_Country where isempty($Input0.value) or toktains(Source_IP, $Input0.value) or toktains(Dest_IP, $Input0.value) where isempty($Input1.value) or toktains(srcPort, $Input1.value) or toktains(dstPort, $Input1.value) where isempty($Input2.value) or weaktoktains(Src_Country, $Input2.value) or weaktoktains(Dst_Country, $Input2.value) limit 10000 |
With the search boxes functioning, you can add a secondary table to review country codes more easily. Create a data widget from the same source table, selecting the country fields, adding our search box logic, and grouping by country fields:
| from firewall.paloalto.traffic select mm2country(ip4(srcIp)) as Src_Country, mm2country(ip4(dstIp)) as Dst_Country where isempty($Input0.value) or toktains(srcIp, $Input0.value) or toktains(dstIp, $Input0.value) where isempty($Input1.value) or toktains(srcPort, $Input1.value) or toktains(dstPort, $Input1.value) where isempty($Input2.value) or weaktoktains(Src_Country, $Input2.value) or weaktoktains(Dst_Country, $Input2.value) group every – by Src_Country, Dst_Country |
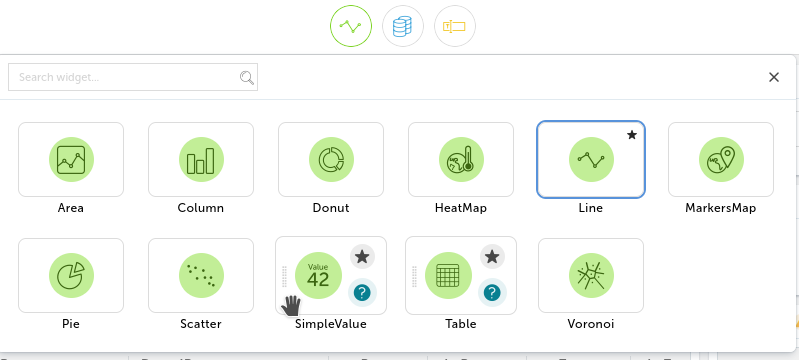
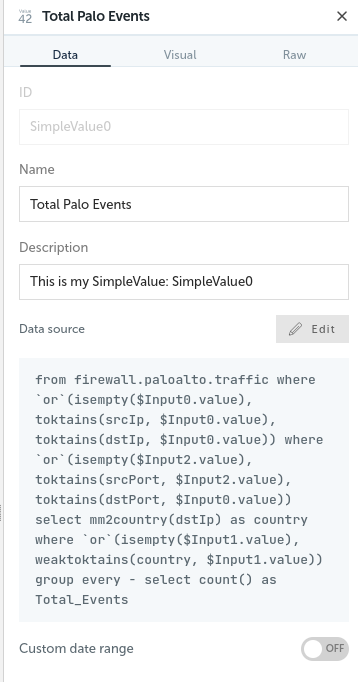
Depending on how many source tables you want to work with on this Activeboard, it’s very likely that your data will run off the bottom of the page. You can add a simple total event count to the top of the page so you know if a given source table has any results in it without having to scroll to the bottom. Drag a new “SimpleValue” widget into the Activeboard, set an appropriate name, and populate its query with a slightly modified version of the query the data widget is using. In place of the limit operation, add a grouping with count aggregation to provide an at-a-glance total, adjusting for when you use the search boxes.
| from firewall.paloalto.traffic select eventdate, ip4(srcIp) as Source_IP, srcPort, ip4(dstIp) as Dest_IP, dstPort, srcZone, dstZone, mm2country(ip4(srcIp)) as Src_Country, mm2country(ip4(dstIp)) as Dst_Country where isempty($Input0.value) or toktains(Source_IP, $Input0.value) or toktains(Dest_IP, $Input0.value) where isempty($Input1.value) or toktains(srcPort, $Input1.value) or toktains(dstPort, $Input1.value) where isempty($Input2.value) or weaktoktains(Src_Country, $Input2.value) or weaktoktains(Dst_Country, $Input2.value) group every – select count() as count |
With our first set of widgets added to your Activeboard, you can repeat the process for the rest of the source tables. To help streamline this process, you can clone widgets by clicking the ellipsis menu button on the top right corner of the widget and selecting “clone.” This way, you can simply edit the query for each cloned widget and replace the table and field names.
Note: You do not need to create new Input/ search boxes; your widgets will all take input from the original three you created.
End result:
For set up a username-based Activeboard, the basic workflow remains the same:
Here’s an example of a username-based Activeboard:

While building these types of Activeboards may initially seem time consuming, the time they can save analysts during critical investigations or incident response activities is priceless. This blog post only scratches the surface of what is possible with Activeboards, but this general workflow should help you create more tailored Activeboards for your organization.


